Why You’ll Love This Horse Cake Recipe
Whether you’re a horse lover or just looking for a fun cake to impress at your next gathering, you’ll absolutely love this Horse Cake recipe. It’s not just a dessert; it’s a delightful centerpiece that sparks joy and conversation. The creative process is so enjoyable, allowing you to express your artistic side while crafting a whimsical cake. Plus, the combination of flavors and textures makes every bite a treat! Friends and family will be amazed at your baking skills, and you’ll bask in the compliments. This cake is sure to become a cherished memory in your culinary adventures.
Ingredients of Horse Cake
Making a Horse Cake isn’t only a creative outlet but also a fun way to bring a smile to everyone’s face. Imagine the look on your friends’ and family’s faces when you reveal this adorable cake that looks just like a horse!
It’s a perfect project for birthdays, horse-themed parties, or just because you want to brighten someone’s day. The best part is that the ingredients are pretty straightforward, making it accessible even for those who aren’t expert bakers.
So, let’s gather what we need and get ready to whip up this whimsical masterpiece.
Ingredients for Horse Cake:
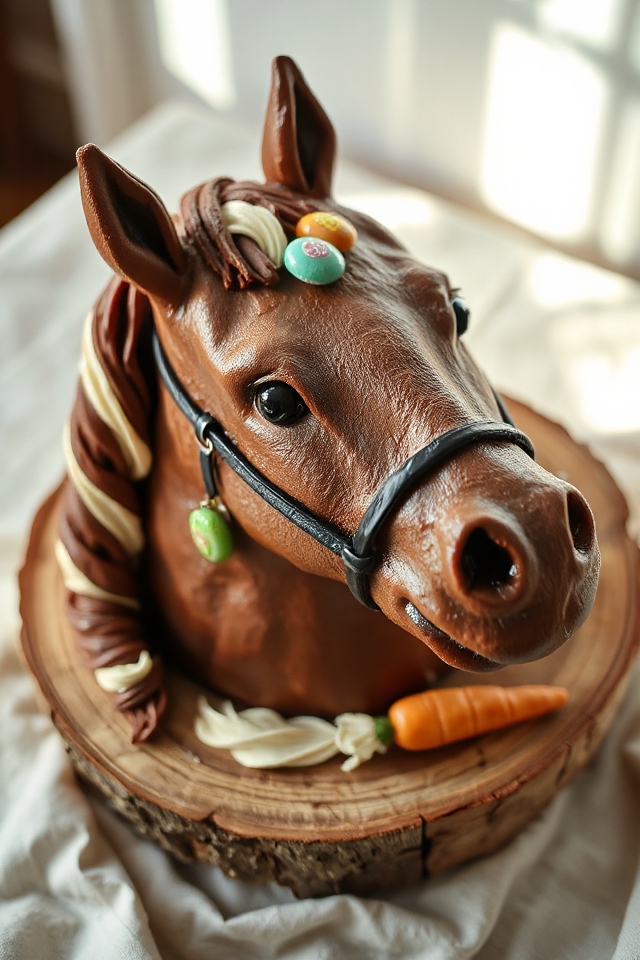
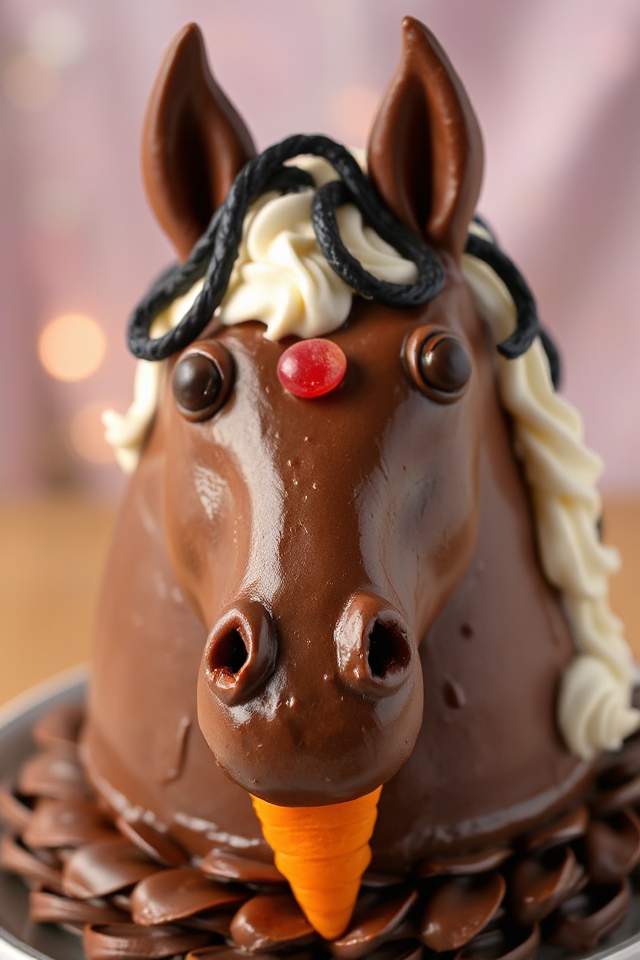
- 1 baked 13- x 9- x 2-inch chocolate cake
- 3 cups chocolate frosting
- 1 cup white frosting
- Black licorice strings
- Life Savers candies
- Mini jawbreaker candies
- Black jelly beans
- Marzipan
- A carrot (for the horse’s treat)
- Additional frosting (for decorating)
When it comes to gathering your ingredients, don’t stress too much. You can easily find everything at your local grocery store.
If you’re not a fan of black licorice, feel free to switch it out for something else—maybe some colorful ribbon or even gummy candy could work. The same goes for the jelly beans—pick your favorite colors!
And if you’re feeling adventurous, why not try a different flavor of cake? A vanilla or carrot cake could add a fun twist to this horsey delight.
Just remember, the goal here is to have fun and let your creativity shine—if you make a mistake, just think of it as adding character to your cake. After all, it’s the joy of baking and sharing that truly counts.
How to Make Horse Cake
Now that you’ve gathered all your ingredients, it’s time to plunge into the fun part—making your Horse Cake! Start by taking that 13- x 9- x 2-inch chocolate cake that you’ve baked and frozen for 2 to 3 hours. This step is essential because a frozen cake is much easier to cut, and trust me, you don’t want to go through the hassle of a crumbly mess.
So, place the cake in front of you with the long side parallel to the edge of your counter. With a sharp knife, cut an arch from one end of the cake to create the horse’s head. Then, make a triangular cut at the bottom of the rectangle where the mouth meets the neck. Now, take that triangular piece and pop it on top of the head for the ear. If you’re feeling a bit lost, just picture a horse’s shape in your head—it’s a lot like trying to draw a horse; just keep it simple and have fun with it.
Once you’ve got your cake shaped, the next step is frosting! Grab those 3 cups of chocolate frosting and spread it all over the cake, covering every bit of that brown canvas. This is where you can get a little creative. If you’re feeling adventurous, try using melted chocolate instead of frosting for a unique twist. Just remember, once that chocolate firms up, you can trim away any excess and pipe on some extra chocolate frosting for a mane.
And speaking of frosting, don’t forget your 1 cup of white frosting—it’s perfect for giving your horse a spiffy mane that really pops against the chocolate. Now, let’s talk about the fun decor: braid some black licorice strings for the bridle and reins, and connect them using Life Savers candies. Kids love this part, and if you’re anything like me, you might just find yourself snacking on a few Life Savers along the way.
Now for the finishing touches. Use black licorice to create the horse’s eye by coiling it up and topping it with a Necco wafer and a mini jawbreaker. If you’re like me and can’t get enough frosting, pipe on some eyes and a nose, too.
For the final flourish, give your horse a jelly bean for a nose and a marzipan carrot for a treat. Look at that masterpiece! It’s not just a cake; it’s a delightful equine creation that’s sure to bring smiles all around. Just remember, if your horse doesn’t look perfect, don’t worry—character is what makes it special. Enjoy the process, and most importantly, have fun sharing your creation with others!
Horse Cake Substitutions & Variations
If you’re looking to mix things up with your Horse Cake, there are plenty of substitutions and variations you can try to make it uniquely yours.
For a different flavor, swap chocolate frosting for cream cheese or vanilla. You can also use fondant instead of frosting for a smoother finish.
If you’re not a fan of licorice, try using fruit strips or candy ropes for the bridle. For the mane, consider shredded coconut or edible glitter to add some flair.
You can even change the horse’s colors by using food coloring in your frosting. Let your creativity shine!
Additional Tips & Notes
Creating a Horse Cake can be a fun and rewarding experience, but a few additional tips can help guarantee your success.
First, make sure to freeze the cake for a couple of hours before cutting; it makes shaping easier.
When frosting, don’t rush—let each layer set before adding the next for a smooth finish.
I recommend using a piping bag for details; it gives your design a professional touch.
If you’re short on time, pre-made decorations can save the day.
Finally, don’t forget to have fun; creativity is key, so let your imagination run wild while decorating!