Why You’ll Love This Picnic Cake Recipe
When you take a bite of this picnic cake, you’ll immediately understand why it’s a crowd favorite. The moment that soft, fluffy texture meets your tongue, you’ll feel like you’re enjoying a slice of nostalgia.
It’s not just a cake; it’s a celebration of flavors that bring everyone together. The subtle hints of peanut butter and the creamy frosting create a delightful harmony that’s simply irresistible.
I’ve served this cake at countless gatherings, and every time, it disappears within minutes. Trust me, once you try it, you’ll be hooked and enthusiastic to share it with friends and family!
Ingredients of Picnic Cake
When it comes to whipping up something delicious for a picnic or a family gathering, this picnic cake is a must-have. It’s simple to make, and the ingredients are pretty straightforward, which is great because let’s face it, nobody wants to spend hours measuring and mixing.
You’ll find that each ingredient plays a part in creating that dreamy texture and the delightful peanut butter flavor that makes this cake so special. So, let’s gather our ingredients and get ready to bake something magical.
Here’s what you’ll need to make this delightful picnic cake:
- 1/2 cup butter or 1/2 cup margarine
- 1 1/4 cups sugar
- 1/4 cup smooth peanut butter
- 1 teaspoon vanilla extract
- 2 eggs
- 2 cups all-purpose flour
- 1 tablespoon baking powder
- 1/2 teaspoon salt
- 1 cup milk
- 1/4 cup butter or 1/4 cup margarine (for frosting)
- 1/4 cup smooth peanut butter (for frosting)
- 1 teaspoon vanilla extract (for frosting)
- 2 1/2 cups icing sugar (for frosting)
- 1/4 cup milk (for frosting)
Now, while those ingredients may seem pretty basic, there are several factors to keep in mind. First off, the quality of your peanut butter can really make a difference. I mean, go for the smooth stuff, but also, if you’re a crunchy peanut butter fan, you could totally swap it in for a fun twist.
Just imagine those little peanut bits adding extra texture. And about the flour—measure it correctly, or you might end up with a cake that’s more of a brick than a delight.
Also, if you want to get a bit fancy, consider adding some chocolate chips or nuts; they can take this cake from delightful to downright divine. So, have fun with it, and remember, the kitchen is your playground!
How to Make Picnic Cake
Now that we’ve gathered all our ingredients, it’s time to embark on the fun part: making the picnic cake. First, grab your mixing bowl and cream together 1/2 cup of butter (or margarine if that’s your jam) with 1 1/4 cups of sugar. You want this to be light and fluffy, so don’t rush it. Imagine you’re whisking away your worries—let that sugar and butter dance together until they’re a perfect pair.
Once you’ve achieved that dreamy consistency, it’s time to add in 1/4 cup of smooth peanut butter, 1 teaspoon of vanilla extract, and 2 eggs. Mix it all up until it’s well combined.
Next, let’s get our dry ingredients in on the action. In a separate bowl, blend together 2 cups of all-purpose flour, 1 tablespoon of baking powder, and 1/2 teaspoon of salt. It’s like a little science experiment, but with way more tasty rewards.
Gradually add this dry mixture to your buttery blend, alternating with 1 cup of milk. Go slow; you want to keep everything nice and smooth. After each addition, make sure to mix it well—no one wants lumps in their cake.
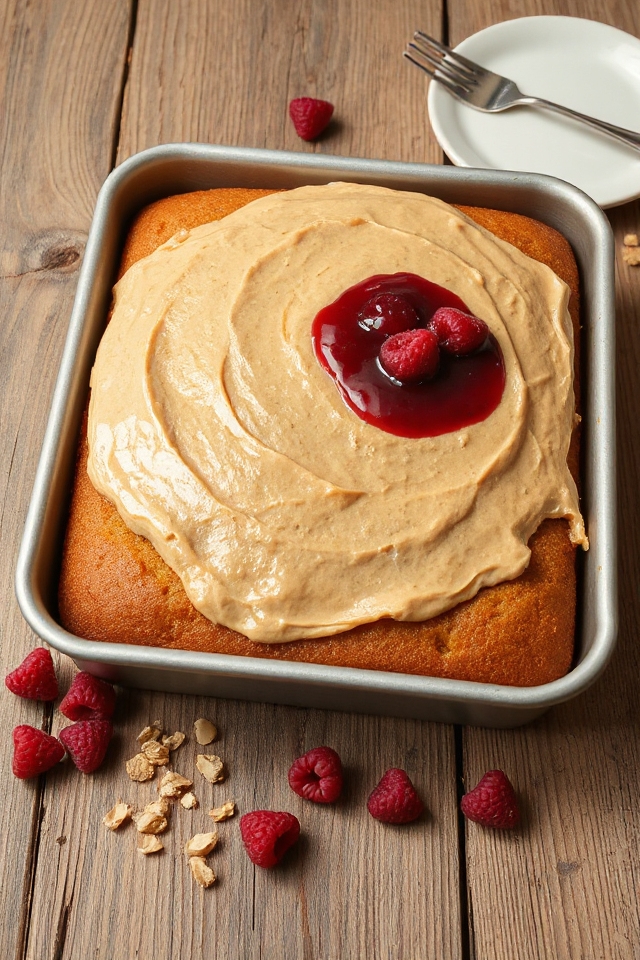
Once everything is combined, pour the luscious batter into a greased 13 x 9 baking pan. It should look like pure peanut butter heaven. Now, pop it into a preheated oven at 350 degrees F for about 30 to 35 minutes. You’ll know it’s done when a toothpick comes out clean from the center.
While your cake is baking, take a moment to admire your kitchen skills. Seriously, you’re already halfway to a picnic masterpiece.
Once the cake has cooled in the pan, it’s time for the icing on the cake—literally. In a clean bowl, cream together 1/4 cup of butter (or margarine), 1/4 cup of smooth peanut butter, and 1 teaspoon of vanilla for the frosting.
Gradually add in 2 1/2 cups of icing sugar and 1/4 cup of milk, beating until it’s light and fluffy. If it’s too thick, don’t fret—just add a splash more milk.
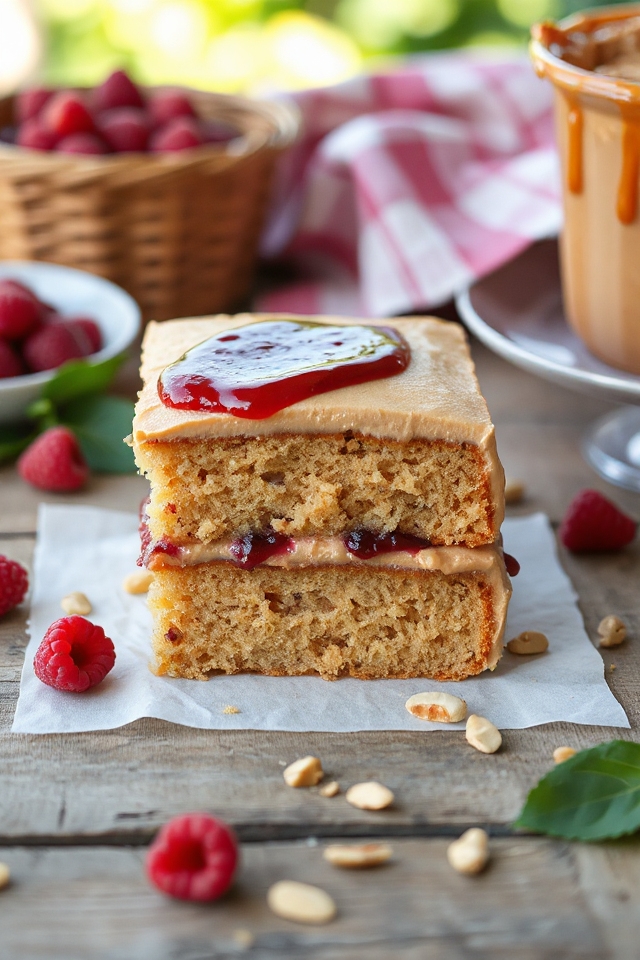
Spread this delicious frosting over your cooled cake, and if you’re feeling a little fancy, drizzle some raspberry jam over the top. Voilà! You’ve just created a picnic cake that will definitely steal the show.
Picnic Cake Substitutions & Variations
After you’ve whipped up that delightful picnic cake, you might be wondering how to customize it to suit your taste or dietary needs.
I love swapping out the all-purpose flour for almond or gluten-free flour for a different texture. If you’re not a fan of peanut butter, feel free to use almond or sunflower seed butter instead.
For a fruity twist, try adding mashed bananas or applesauce to the batter. You can also toss in some chocolate chips or nuts for extra flavor.
And don’t hesitate to experiment with different frostings, like cream cheese or chocolate ganache!
Additional Tips & Notes
To guarantee your picnic cake turns out perfectly, I recommend checking your oven’s temperature with a thermometer, as inaccurate readings can lead to uneven baking.
Also, make sure to cream the butter and sugar thoroughly; this helps create a light texture. If you want a richer flavor, feel free to mix in some chopped nuts or chocolate chips.
For the frosting, adjust the milk to achieve your desired consistency.
Finally, don’t rush the cooling process—letting it cool completely guarantees that the frosting stays intact when you spread it.
Enjoy your delightful picnic cake!